

Running a Kong API Gateway on Fly.io
Microservices have gained widespread adoption in the past decade, but they present their own set of challenges. Traffic control, authentication, logging, and rate limiting are essential in distributed architectures, but not easy to manage when your organization runs dozens or hundreds of APIs. Kong provides an excellent solution to these problems. It’s an open-source API gateway that sits between your users and backend services. By proxying requests through Kong, you can enforce standardized authentication rules, log requests and errors, and even transform data on the fly. Kong can be deployed to a central server, but this slows down your application because all your web requests must pass through a central location before being sent to your backing services. Fortunately, you can take advantage of Fly’s edge hosting model to improve performance by serving Kong on Fly’s globally distributed network.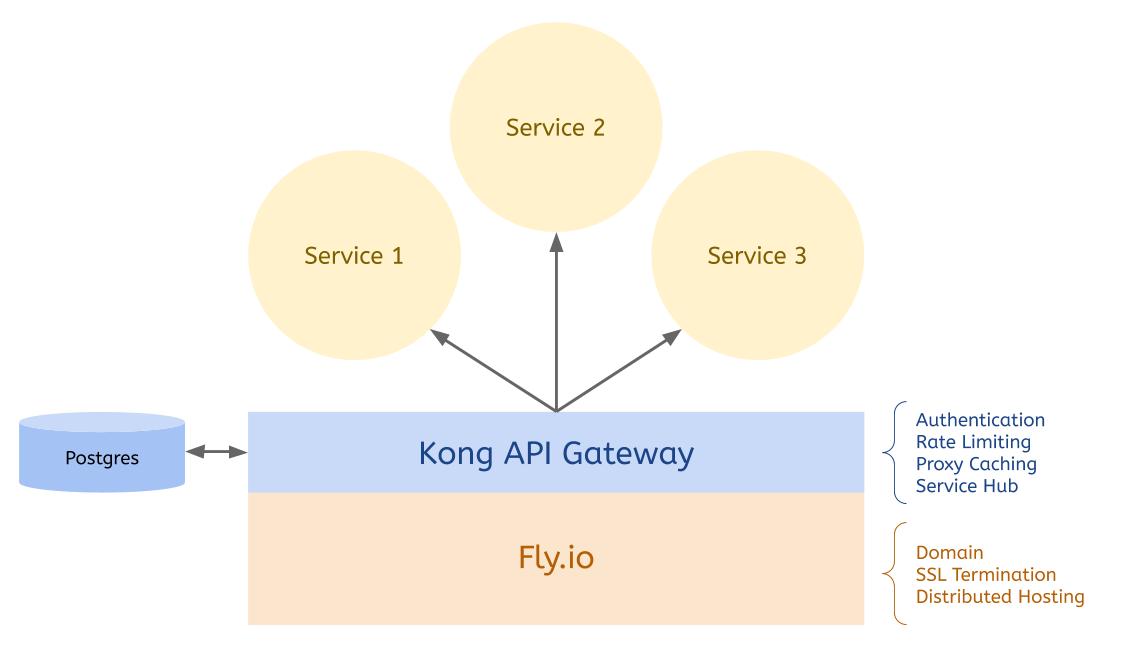
How to Deploy a Kong API Gateway to Fly
In this tutorial, you’ll see how to deploy a Kong API Gateway to Fly.io. You’ll expose the free JSON Placeholder as a backend service and use Kong to add rate limiting and API key authentication. Finally, you’ll see how to lock down the Kong Admin API so that only authenticated users can access it. You’ll see all the steps required in this tutorial, but if you’d like to download the final working application, it’s available on Github.Prerequisites
- Flyctl command line tool.
- A Postgres database that is publicly available and allows connections (I created one on Heroku). Kong will use this as a central data store.
- Docker for running the one-time Kong database migrations.
Creating a New Fly Application
First, you’ll need to useflyctl to create a new application. If you haven’t already, install the appropriate version of flyctl for your operating system using the instructions here.
Next, sign up or sign in to your Fly account via the command line:
fly-kong and create your new app inside of it:
Dockerfile as your builder. You should see output similar to this in your console:
fly.toml file and Dockerfile in the root of your project.
Open the fly.toml file and modify the [[services]] portion:
10001, which you’ll use for the Kong Admin API.
Because of the filesystem permissions required for writing to the /dev/std* logs, you need to run the container as root. Open up the Dockerfile and replace it with the following:
Preparing Your Database
Before you can use your Kong API Gateway, you’ll need run the Kong database migrations. You can do this using Docker:Starting Kong
Your Fly instance will connect to the Postgres database you prepared in the previous step, but first, you need to add your database connection credentials to Fly as application secrets. Run the following in your terminal:https://<your-app-name>.fly.dev, but all you’ll see is the message, “no Route matched with those values.” In the next section, you’ll see how to set up Services, Routes, and Plugins using the Kong Admin API.
Using Kong to Secure an API
You have a working instance of Kong deployed to Fly, but it’s not useful without any Services or Routes. In this section, you’ll see how to add a Service and configure rate limiting and API key authentication. Finally, you’ll secure the Kong Admin API to prevent unauthorized access to your Gateway’s configuration.Adding a Backend Service
Kong will proxy web requests it receives to any backend API you set up. To demonstrate this functionality, you’ll create a new service that proxies requests to JSON Placeholder. This free service returns a JSON payload similar to what you might find when connecting to a REST API. To add JSON Placeholder’s/posts resource as a service named posts, use curl to post it to the Kong Admin API:
/posts, and it will act as a proxy for the posts Service you just created:
https://<your-app-name>.fly.dev/posts to see the /posts payload from JSON Placeholder:
flyctl logs.
Rate Limiting Access
If you’re exposing your API publicly, rate limiting your users is probably a good idea. You can use Kong’s Rate Limiting plugin to ensure that users can’t abuse your API by repeatedly calling the same endpoint. This encourages users to cache responses and can save significant load on your servers. To add the Rate Limiting plugin, use the Kong Admin API again:local is fine for this use case.
To test the rate limiting out, go to https://<your-app-name>.fly.dev/posts in your browser and hit refresh six times in a row. On the 6th refresh, you should see the message, “API rate limit exceeded.”
API Key Authentication
If your API is only going to be used by trusted consumers, you should limit access using API Keys or another form of authentication. To add authentication to the/posts Route, you can use curl again to post to the Kong Admin API:
admin using the Kong Admin API:
key that Kong returns as you’ll need it to test out the API Key authentication.
To test that authentication is working, refresh https://<your-app-name>.fly.dev/posts in your browser. You should get a message saying, “No API key found in request.”
Next, add your API Key as a querystring parameter called apikey. For example, https://<your-app-name>.fly.dev/posts?apikey=<your-api-key>.
This time, you should see the list of posts returned in the previous steps. Kong is now protecting your posts Service, but your Admin API is still publicly exposed. This means anyone who knows your URL and port could create Consumers or redirect your Services to their backend.
Securing the Kong Admin API
Kong provides several methods for securing the Admin API, but the simplest in a distributed hosting environment like this is to use a loopback. Because Kong can secure any service, you can use Kong to secure its own Admin API. First, add a new service calledadmin-api which points to localhost:8001:
https://<your-app-name>.fly.dev:10001 or using a valid API key at https://<your-app-name>.fly.dev/admin-api?apikey=<your-api-key>. To shut off open access, you just need to update your fly.toml file and re-deploy Kong.
Remove the Kong Admin portion of the fly.toml file:
https://<your-app-name>.fly.dev/admin-api?apikey=<your-api-key> with a valid API key.